

How to Make a Media Kit as a Content Creator (Free Template)
SocialNest Team
July 8, 2026 · 9 min read
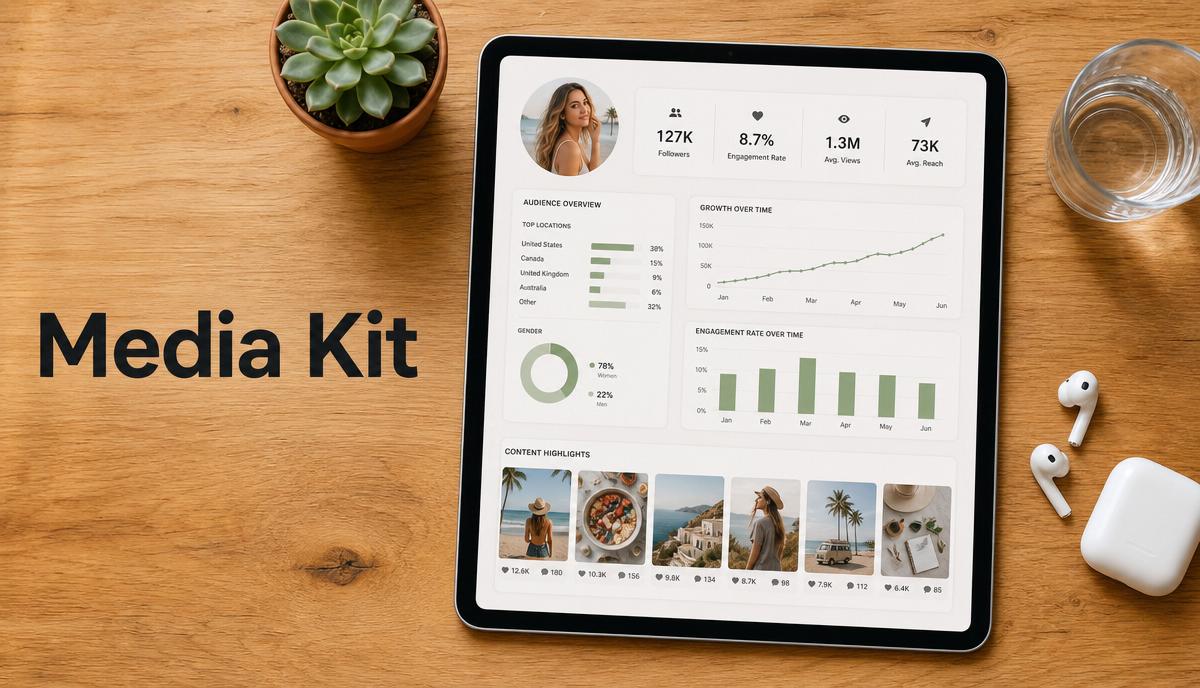
In the creator world, your media kit is your resume, your portfolio, and your sales pitch all rolled into one. Brands are moving their money away from old-school ads and into influencer marketing, and they're looking for a lot more than just a big follower count. They want to see data. They want to see professionalism. And they really want to see if your audience actually buys things.
If you're still sending brands a bunch of random screenshots from your Instagram insights or a PDF you haven't touched in six months, you're leaving money on the table. A great media kit is what turns you from "just a content creator" into a legitimate business owner. So, let's walk through what you need to include, how to make it look good, and how to put the whole thing on autopilot so your stats are never out of date.
Okay, but what even IS a media kit?
Think of it as a brochure for your personal brand. When a brand manager or an agency rep opens your email, they need to know in about five seconds if your audience is the same group of people they're trying to sell to.
Without a professional media kit, you're making them do all the homework to figure out if you're a good fit. And honestly, they're too busy for that. They'll just move on to the next creator in their inbox. Having a polished kit ready to go shows you get the business side of things, which instantly makes you a more attractive partner.
The absolute must-haves for your kit
You can get creative with the design, but the information has to be there and it has to be easy to find. These are the sections you just can't skip.
Your quick bio (and I mean quick)
Start with a short bio. But this isn't your life story—it’s your pitch. What's your whole deal? What kind of content do you make? Make your niche crystal clear, whether it's sustainable fashion, nerdy tech reviews, or genius parenting hacks.
The numbers brands actually care about
This is the most important part of the whole document. Brands need to see your stats across every platform you're on. Don't just list follower counts, that's a rookie move. You need to include:
- Engagement Rate: Honestly, this is often way more important than how many followers you have. It shows people are actually interacting with your stuff.
- Monthly Reach/Impressions: How many unique people see your content every month?
- Video View Averages: If you're big on TikTok or Reels, this is non-negotiable.
Who's listening to you?
Look, brands aren't just paying for your content. They're paying for access to your audience. So you have to show them exactly who that audience is. Break it down for them.
- Location: Where do your followers live? Show the top countries and cities.
- Age Range: Give them the standard brackets, like 18–24 or 25–34.
- Gender: Super helpful if they're selling something gender-specific.
Show off a little
Nothing convinces a brand faster than seeing that other brands have already trusted you. Include a section with the logos of companies you've worked with. And if you can, add a "Mini Case Study." It can be a single sentence that packs a punch, like: "My campaign for Brand X drove over 500 clicks and hit a 4% conversion rate."
What you offer (and what it costs)
Some creators get squirrelly about putting their rates in their media kit, and that's fine. You can leave them out if you want more room to negotiate. But listing "Starting at" prices can be a great way to weed out brands that have absolutely no budget. Clearly list out what you sell—dedicated YouTube videos, a set of Instagram Reels, a shout-out in your newsletter, you name it.
A better way to do this: Instead of a static PDF that's outdated the moment you send it, use a live media kit. SocialNest’s media kit builder actually syncs with your social accounts, so your follower counts and engagement rates are always up-to-date in real-time.
Wait, isn't that just a portfolio?
People mix these up all the time, but they have totally different jobs. A media kit is all about the data—it's focused on the reach you have. A portfolio is all about the creative—it's focused on the quality of your work.
| Feature | Media Kit | Portfolio / UGC Gallery |
|---|---|---|
| Main Goal | Show audience size and potential sales impact | Show your creative talent and style |
| Key Stats | Demographics, Engagement, Reach | Your aesthetic, editing skills, photo quality |
| Best For | Getting sponsored posts on your own feed | Getting hired to create content for a brand's feed |
| How Often to Update | Monthly (or just have it update in real-time) | When you create new work you're proud of |
For best results, your media kit can pull double duty by including a small gallery of your best work, giving brands a little taste of both.
Don't worry, you don't need to be a designer
You don't need a graphic design degree to make a great media kit. You just need to keep it clean and easy to read.
Keep it short. Seriously. Two or three pages, max. Brand managers don't have time to read a 10-page novel about you. Use bullet points and icons to make the information scannable.
And please, use high-quality photos of yourself. Include at least a few high-res shots that show you in your element—holding your camera, trying a recipe, whatever it is you do. No grainy selfies from 2018. These photos prove you care about quality.
Your media kit should feel like you. Use the same fonts and colors you use on your Instagram or YouTube channel. If your whole vibe is minimalist and neutral, your media kit shouldn't show up looking like a neon rave party.
The most annoying part: Keeping it updated
Let's be real, the worst part of having a media kit is the "monthly update." You have to log into Instagram, then TikTok, then YouTube... grab all your new stats, and then manually type them into your Canva template. It's a huge pain. By the time you send it to a brand, the numbers are already old anyway.
This is exactly what SocialNest fixes with its dynamic media kit. Since it's an all-in-one tool, it's already connected to your analytics. It spits out a custom URL you can send to brands. When they click it, they see your stats right now, not your stats from last quarter.
You can even add links to your storefront or show off results from recent campaigns right on the page, giving brands a complete picture of what you can do.
So you've got a kit. Now what?
Okay, having the kit is only half the job. You have to actually get it into the right hands. When you email brands, don't just attach the file and write "Let's collab."
First, find the right person. Go on LinkedIn and look for titles like "Influencer Marketing Manager" or "PR Coordinator." Then, personalize your email. Mention a recent campaign they ran that you actually liked. Finally, go for the soft close: "I’ve put together a live media kit with all my latest audience stats and rates. You can check it out here: [Link]. I have some ideas on how we could reach [their target audience] together."
If you're juggling a bunch of these conversations, use a brand-deal CRM to keep track of who you've emailed and when you need to follow up. Staying organized is often the difference between a $500 deal and a $5,000 one.
Please don't do these things
- Don't fake your numbers. Seriously. Brands use tools that can spot fake followers or juiced engagement from a mile away. Your authenticity is the only thing you really have.
- This feels obvious, but... include your contact info. Make sure your email address is on every page and it's easy to find. You'd be surprised how many people forget this.
- Tell them why it matters. Don't just say you have 50k followers. Tell them why those 50k followers trust you and how that trust can help the brand make sales.
Your first media kit layout, simplified
If you're just starting, don't overcomplicate it. Follow this basic structure:
- Page 1: The First Impression. A great photo of you, your social handle, and a quick one or two-sentence mission statement.
- Page 2: The Numbers. A clean grid showing your followers, engagement rate, monthly reach, and top 3 audience locations for each platform.
- Page 3: The Proof. Drop in 4-6 screenshots of your best-performing content and the logos of past brand partners.
- Page 4: The Ask. Your email address, a clear call to action, and a link to your SocialNest link-in-bio so they can see everything in one place.
Quick tip for YouTubers: Always include your "Average View Duration." Brands love this metric because it shows that your audience is actually sticking around and paying attention.
Use your data to ask for more money
Once you have your media kit, don't just let it sit there. Use your own analytics to make it even better. If you see that your engagement spikes on Tuesdays when you post about a specific topic, you can go to brands in that niche and show them a proven track record.
The more specific you can get with your data, the more you can charge.
For example, if you can show that your audience has a high "intent to buy" by sharing the click-through rates from your link-in-bio, you're offering way more value than a creator who can only show off their follower count.
A good media kit is what separates the hobbyists from the professionals. It shows brands you're a serious partner they can trust with their budget.
Ready to stop messing with spreadsheets and start landing bigger brand deals? You can build a professional, auto-updating media kit in a few minutes with SocialNest.
Start free with SocialNest today and actually take control of your career.
Ready to simplify your creator workflow?
Plan, post, and grow across every platform — all in one place.
Start freeRelated articles
How to Track Brand Deals Without a Spreadsheet
Managing a growing creator business is a dream until the administrative nightmare of brand deals sets in. In the beginning, a simple spreadsheet feels like enough. You track a few names, dates, and…
How to Repost TikTok Videos to Instagram (and Every Other Platform) in 2026
The creator economy in 2026 is no longer about being "everywhere" through manual labor; it is about being everywhere through strategic distribution. If you are spending hours filming a high-quality…
How to Automate Instagram DMs Without Getting Banned
For many creators, the Instagram Direct Message (DM) folder is where the magic happens. It’s where casual followers turn into loyal fans, where brand deals are negotiated, and where sales are closed.…